This article explains how to change the code in your Blogger theme to display an SEO-friendly title for your site.
Like the title says, this is an article about the title tag in Blogger, not about SEO-friendly titles per se. Since I am not an SEO expert I urge you to read the article 'How to craft great page titles for SEO' on Yoast.com, which deals with how to compose a good title.
Search Engine Optimization (SEO) has become somewhat of a science. If you have a company or if you are responsible for a company's marketing or the maintenance of its website, it really pays off to hire an SEO expert.
As far as Content Management Systems are concerned, you are at an advantage when you work with WordPress and its myriad of plugins, Yoast being the best known, that can assist in optimizing your website for search engines.
If you don't want to read this article in full, but wish to jump to the instructions on how to change the code for the title tag in Blogger, please click here.
Creating an SEO-friendly title tag for your Blogger website
This does not mean that it is impossible to optimize Blogger for search engines though. It's just more laborious. In WordPress, the code to optimize a site can be installed with plugins. For Blogger there aren't many plugins available and none that take care of search engine optimization.
It is not impossible to optimize Blogger for search engines. It's just more laborious.
That means that you have to add or change bits of code in your Blogger theme to make your blog SEO-friendly.
Use case
The title of your blog as seen by search engines can be displayed by hovering your mouse button over the tab in which your blog is opened.
The default behaviour on Blogger is that only the title of the current page is shown, which means it either shows your blog's title (e.g.: O'Cor) if you're on the homepage or it shows the page's or article's title (e.g.: Blogger Tutorial: the best SEO title tag) if that is what is currently displayed.

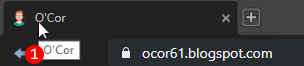
Screenshot of a default homepage title (1) in Blogger
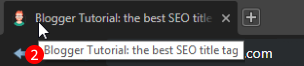
Screenshot of a default page title (2) in Blogger
The ideal behaviour however, is that both are shown. For this tutorial that would be 'Blogger Tutorial: the best SEO title tag' and 'O'Cor'.
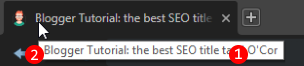
Optimized title tag on Blogger displaying the page title (2) as well as the blog title (1)
Below you will find instructions on how to change the Blogger title tag in your theme's code to optimize the title that is displayed to search engines and humans.
Instructions
Before you change even one bit of code, please create a backup copy of your theme first and save it somewhere safe. Don't say I didn't warn you!
Blogger themes are written in XML (Extensible Markup Language), which is "a markup language that defines a set of rules for encoding documents in a format that is both human-readable and machine-readable" (Wikipedia:XML).
- After you have logged in to Blogger, find your blog if you have more than one, then click on Theme in your Blogger dashboard,
- Next, click the button [Edit HTML], which can be found right under the screenshot of your homepage,
- Now you are presented with a long code block with the code for your theme, the very heart of your website.
Press Ctrl-F to find the following line of code:
The part between<title><data:view.title.escaped/></title><title>and</title>is your theme's title tag. This line is typically the sixth line or near the sixth line from the top, - Delete this whole line (not just the title tag) and replace it with the following five lines of code:
<b:if cond='data:view.isHomepage'> <title><data:view.title.escaped/></title> <b:else/> <title><data:view.title.escaped/> | <data:blog.title/></title> </b:if> - Now click [Save theme] to save your changes,
- Open your homepage and press F5 to refresh the page. The title should be exactly like it used to be, which is just the title of your blog,
- Then open a subpage or an article. The title should now display both the title of your page or article and the title of your blog.
If all is well, you can now close your dashboard. That's a wrap!
Explanation
It's always good to understand the code you add to your website, even if you are not a technical person. I'll explain the new code line by line:
The first line performs a conditional check whether the currently displayed page is your homepage:
<b:if cond='data:view.isHomepage'>If it is, the title tag displays only the title of your blog:
<title><data:view.title.escaped/></title>If the current page is not your homepage, something else should be done:
<b:else/>When we get to line 4, the code has determined that the current page is not the homepage. That is why at this point the title tag is changed into the title of the current page or article, followed by the | character (called a 'pipe' symbol) and the title of your blog:
<title><data:view.title.escaped/> | <data:blog.title/></title>The last line indicates the end of this block of code:
</b:if>Variations
Of course, many variations are possible. For example, you could expand the title tag <data:blog.title/> in the second and fourth lines:
<title><data:blog.title/>: where nerds and real people meet</title>

 <title><data:view.title.escaped/> | <data:blog.title/>: where nerds and real people meet</title>
O'Cor: where nerds and real people meet
or something slightly more serious, but far too long:
<title><data:blog.title/>: software reviews, tutorials and nerdy tips 'n tricks that you will find nowhere else</title>

 <title><data:view.title.escaped/> | <data:blog.title/>: software reviews, tutorials and nerdy tips 'n tricks that you will find nowhere else</title>
O'Cor: software reviews, tutorials and nerdy tips 'n tricks that you will find nowhere else
or something more serious and usable:
<title><data:blog.title/> reviews, web tutorials & tips</title>

 <title><data:view.title.escaped/> | <data:blog.title/> reviews, web tutorials & tips</title>
O'Cor reviews, web tutorials & tips
Don't go crazy overboard: you want your title to attract attention by both humans and search engines alike and you want it to gain clicks. It can't be too long and remember that your page title will precede as well in most cases. Think SEO!
Don't go crazy overboard with titles. Think SEO!
Again, read the Yoast.com article that I referred to in the beginning of this tutorial.
Also, instead of the pipe symbol, you can use any other symbol to your liking, e.g. -, ~, *, •, ○, ♦ or any other character, as long as it's a printable ASCII character (see ascii-code.com for reference).
Conclusion
It's really not impossible to make Blogger a little more SEO-friendly. You just have to dive into the code and, ideally, know a bit of XML. It's not hard to learn though, so you might do yourself a favour if you spend some time learning it.
Addendum
A couple of days after writing this tutorial, I wrote an 'addendum', which addresses titles generated by non-indexable pages. To read it, please head over to Blogger Tutorial: the best SEO title tag, Addendum.
I'm considering to write more articles about making Blogger more SEO-friendly. Please let me know if you would be interested in those.
Also, let me know if you ran into problems. I'll be sure to answer any questions you may have!
Comments
Post a Comment