Do not read beyond this line if you don't like puzzles and think you are not creative. You have been warned! And just to be on the safe side: you may hate me for writing this tutorial at first, but you will probably be happy I did if you make it to the end!
Do not read beyond this line if you don't like puzzles and if (you think) you're not creative...
Still here? Good, let's get on with it then...
What is a user style?
User styles let you change the way your browser displays web pages. Or better put: with user styles you can change the design of the elements of a web page.
This is done by finding existing elements - selectors, IDs, classes - in the HTML code of a web page, defining your own properties and values for these elements in new CSS rules, and applying these rules to the page with an external style sheet using a browser extension like Stylus.
With a user style you can enhance a page, accentuate certain parts of a page or even completely darken a page to reduce the strain on your eyes while working at night.
Have a look at how an existing page can be changed with a user style:
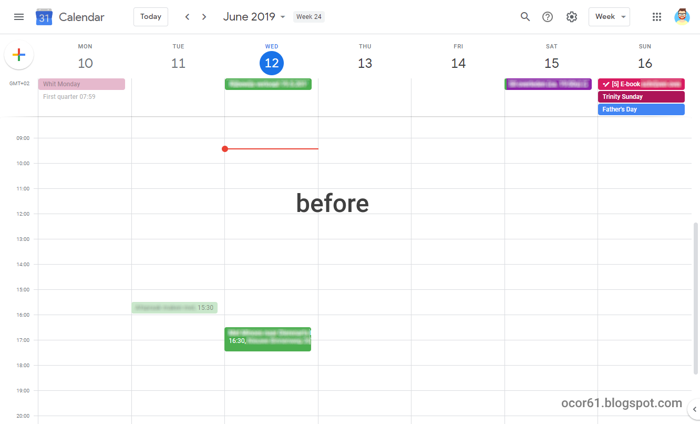
before: Screenshot of Google Calendar with the default week view

after: Screenshot of the same Google Calendar week view with a user style applied
Prerequisites
This tutorial applies to Windows, Linux and macOS and to the web browsers Google Chrome, Mozilla Firefox and Opera. It assumes that you have a good working knowledge of computers.
You don't need any knowledge of programming languages. However, it does require some knowledge of HTML (HyperText Markup Language) and CSS (Cascading Style Sheets).
Online resources
If you need to brush up on your HTML and CSS knowledge, there are some excellent resources online that you can look up:
- Free online HTML course on sololearn.com: HTML Fundamentals,
- Free online CSS course on sololearn.com: CSS Fundamentals,
- css-tricks.com is an excellent resource on CSS, HTML, JavaScript and WordPress development and a beautiful site to boot,
- w3schools.com is one of the oldest resources on the web on HTML and CSS. Besides an extensive HTML Tutorial and a CSS Tutorial, you can find information on a wide variety of languages used on the web today.
Tools you need
- Your browser's built-in developers tools,
- The Stylish or Stylus browser extension. I work with Stylus. Links to the extension for each browser can be found in the sidebar of this blog,
- A good dose of concentration,
- An equally good dose of patience,
- A healthy interest in puzzles,
- A little creativity.
... you need developers tools, Stylus, concentration, patience, a 'puzzling' mind and creativity ...
What is Stylus?
Stylus is an extension that you install into your browser. An extension is a small program that extends the possibilities of your browser.
With Stylus, you can write CSS code (a 'user style') for any website and make it look different. It does this by 'injecting' the code into the site.
Of course, the CSS code you write is only added to the site in your browser. It is not a permanent change to the site. Styles can be disabled or enabled whenever you wish.
Why not Stylish? Stylish is the original extension used to write styles. From the Stylus website: "Stylus is a fork of Stylish that is based on the source code of version 1.5.2, which was the most up-to-date version before the original developer stopped working on the project. The objective in creating Stylus was to remove any and all analytics, and return to a more user-friendly UI." (add0n.com/stylus.html)
How to start writing your own user style
We will dive into the details of this in part 2. I'll give you some time to view the online courses and to install Stylus first. The second part of this tutorial will be published within a week. So come back for more later. We'll make a web designer out of you yet! ;o)
Let me know how you get on. Have you already played around with user styles? Or maybe you like Stylish better than Stylus? And if so, why? Please leave a comment below.
I will try my best to answer any questions you may have.
Comments
Post a Comment