As I wrote in a previous article: I'm a big fan of cloudHQ's collection of Gmail addons. Gmail Notes by cloudHQ is one of a handful of addons that I find myself using frequently. Now it looks even better...
With Gmail Notes you can add one or more notes to an email. The clever thing about this addon is that notes are saved in your mail, not in a separate database. Therefore, notes are searchable with the default Gmail search interface.
...notes are saved in your mail, not in a separate database.
A word about privacy
To achieve this, obviously, the mail is downloaded to cloudHQ's servers and manipulated to include the note. It's good to be conscious about privacy, so before you put your trust in their hands, you may want to know that cloudHQ is situated in the San Francisco Bay Area in the USA. You can check the Whois Record for CloudHq.net yourself at whois.domaintools.com:
Since cloudHQ works with data that is of vital importance to me, I also checked out their CEO and founder Senad Dizdar. Senad is originally from Ljubljana, Slovenia and has been living and working in the US for almost 20 years. He has had an impressive career in IT and seems completely legit. Senad is a backup & recovery specialist and worked for Oracle, amongst other companies, before founding cloudHQ in 2011.
To know how your private data is handled, you should also read cloudHQ's privacy policy.
How does it work?
The team at cloudHQ is really good at creating small addons that are so easy to use that it's almost ridiculous to even read through a manual, let alone write one. So don't consider this a manual, but rather an 'amuse bouche':
To add a note, click the edit field, type the note and click the Save button. This will add a general note to the mail.
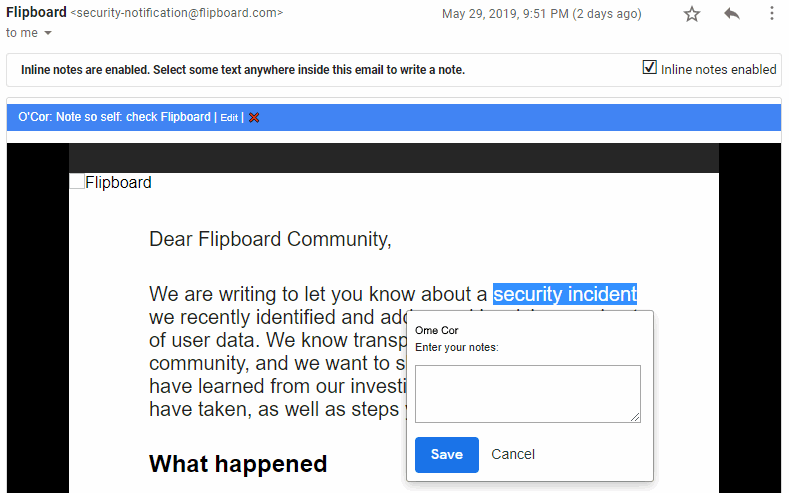
It is also possible to add notes to specific words or passages in the mail. These are called inline notes. First click 'inline notes disabled' to enable inline notes (I know...). Then select the word or words you want to comment on. A popup will appear. Type your note and click save. The note will now be visible inside the mail right after the section it relates to.
...click 'inline notes disabled' to enable inline notes (I know...)
Of course, you can edit or delete your own notes. When you forward an email that contains a note, you are given the choice to leave your notes in the mail or to remove them.
Design
The design. Yes, well... To be honest, I guess I should be grateful to cloudHQ that they don't put much effort in design. This gives me a chance to brush up on my CSS skills and my - albeit limited - design skills.
This is how Gmail Notes looks by default:


1.1. Gmail Notes just sits in your mail waiting for you to enter a note

1.2. Click Save to save the note in your mail

1.3. This is how a general note looks after it is saved

1.4. To create an inline note, click 'inline notes disabled', select one or more words from the mail body, enter your note and click Save

1.5. An inline note is saved in the mail body, right after the section it relates to
Redesign
The changes applied by the user style include:
- Changed: the background colour and border colour for the general edit field,
- Added: a Cancel button (instead of a link),
- Added: the word 'Note' before a note,
- Changed: the background of a general note,
- Added: Edit and Delete buttons (instead of links),
- Changed: the icon plus colour for 'inline notes disabled',
- Changed: the icon plus colour for 'inline notes enabled',
- Changed: border of the mail body in inline notes mode,
- Added/Changed: a yellow note icon that is displayed in your Gmail mail list to make mails with notes more notable (pun intended).
The result looks like this:

2.1. Gmail Notes sitting in your mail - new design

2.2. Save the note in your mail - new design

2.3. A general note - new design

2.4. Creating an inline note - new design

2.5. A saved inline note - new design
As with Gmail Tabs, the screen shots of this new style show a different font as well (it's a Google Font called Roboto Condensed). However, this hasn't been included in the user style. The reason I didn't include it is that a new font may not look good in your setup, so going with the default font is the safest choice.
Do check out Gmail Notes, install the new style and please let me know what you think by leaving a comment below. Also, please let me know if you think the font should be included in a new version of the user style.
The user style can be installed by clicking on the image link below. Have fun using Gmail Notes and Stylus!

Comments
Post a Comment